Snoopy Beach Bag
- Katie Done
- Jul 23, 2021
- 3 min read
With five fabulous prints of Snoopy off on his holidays, I needed to make a beach bag with them. I thought a nice size bag that was big enough for a towel plus all your usual handbag bits.
Alongside a beach bag I have made a smaller zip pouch to clip inside. I always worry about smaller things being loose in a bag but pockets within the bag can be a bit of a pain to get to. This is the perfect solution. After a week long heat wave this week in the UK, we have been looking forward to a trip to the beach. By the time we arranged a day the temperature dropped by 10 degrees, but to be honest it was very welcome!

Seam Allowance: 1/4"
Finished Size: 50cm x 38cm Approx.
WOF = Width of Fabric
YOU WILL NEED
METHOD
1. Cut your fabric (width x height):
Purple Fabric:
2 - 55cm x 42cm
Green Fabric:
2 - 55cm x 42cm
Pink Fabric:
4 - 5cm x WOF
1 - 3cm x 30cm
Cream Fabric:
2 - 55cm x 30cm
Fusible Foam:
2 - 55cm x 42cm
2 - 5cm x 55cm

2. Following the instructions on the brand you use, fuse the foam to the wrong side of your main front pieces. I have used Bosal single sided foam interlining. I love this product for bag making, it gives your bag a beautiful structure. If you don't have it, you could use your regular wadding and add some quilting to it.
When I cut out the foam for the main bag, I had a 5cm wide piece left so I have used this offcut for the bag straps. Find the centre of two of the pink bag straps and fuse it to the reverse in the centre.
3. I have done some batch sewing and ironing in this project to save time.
Fold over a double hem on the top of the cream fabric, press, pin and sew.
Pin a fused and unfused bag strap, right sides together. Sew the two long edges.
Fold the smaller pink strap in half length ways, right sides together, pin and sew.

4. Turn the pink straps to the right way. Press.

5. On the smaller strap, top stitch close to both edges. On the bag straps, top stitch up to the fusible foam and then backstitch.

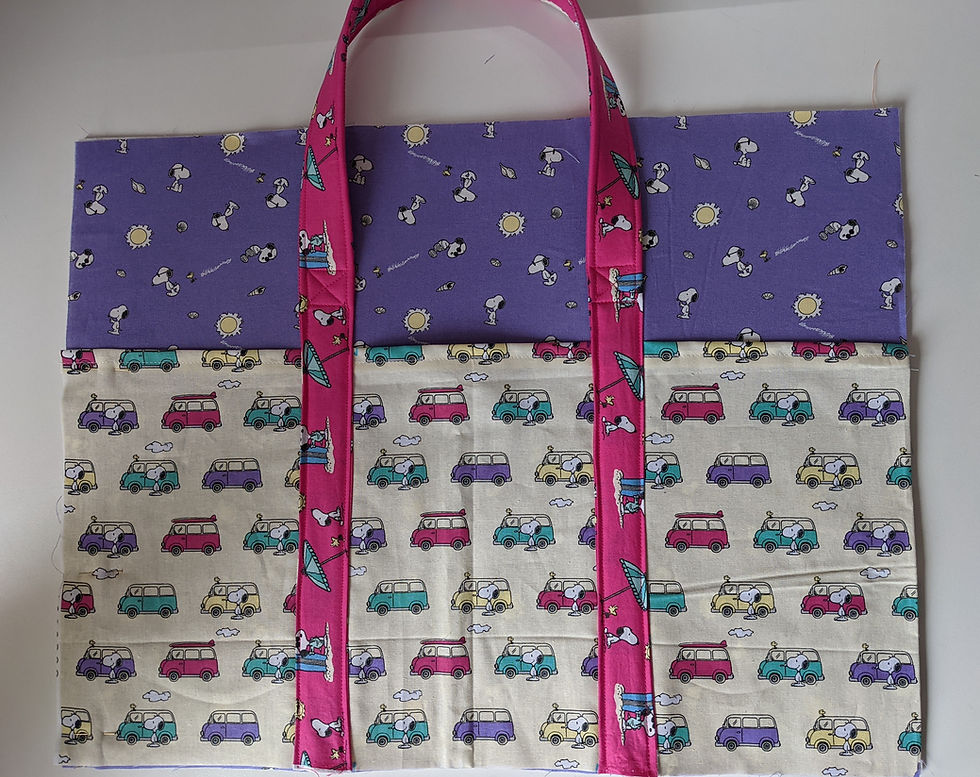
6. Layer the purple, cream and straps as shown below. Pin.

7. Top stitch the straps down over the cream area and up to the part you have already top stitched. Reinforce this area with a cross. Repeat on both sides.

8. Pin right sides together and sew the three edges.

9. To make the box base, bring the side seam and bottom seam together. Mark a line across 2" from the corner. Sew, backstitch at the start and end. Trim and repeat on the opposite side.

10. Fold the inside strap in half and pin to the edge of a lining piece, around 15cm from the top and with a D ring linked in. Baste in place.

11. Place both lining pieces right sides together, pin and sew around the three edges but leave a gap around 4" wide on one of the side edges to turn it out.

12. Repeat step 9 on the lining.

13. With the outside the wrong way and the lining right side facing out, place the lining inside the main bag. Match up the seams and pin all the way around the edge. Sew all the way around. Trim and turn it out through the opening you left in the lining.

14. Sew the opening together. I have used my sewing machine as it will be hidden inside the bag, but you could do a hand slip stitch if you prefer.
Your bag is finished! I hope you have enjoyed this pattern and I would love to hear from you if you have given it a go. I have also made a handy bag to fit inside this one and you can find the pattern on the blog.
For more free tutorials, new fabric arrivals and special offers, make sure you have subscribed to my mailing list.


Opmerkingen