Baby Jersey Romper - 2 in 1 Leggings Pattern
- Katie Done
- Jul 27, 2020
- 4 min read
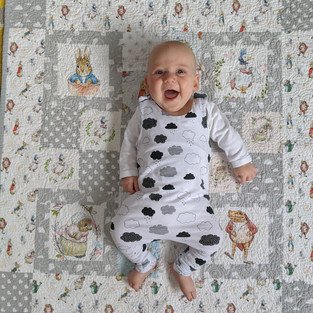
It has taken me several months of trial and error to come up with a pattern that I am happy with, but I am finally ready to share this romper pattern with you. I was given some organic cotton jersey by the Craft Cotton Company to have a play with. It is a great baby print, white with black clouds on. It is always hard to get a feel for a fabric like jersey and you often get what you pay for when it comes to jersey. However, the Craft Cotton Company have managed to produce an excellent quality organic jersey at an affordable price at under £10 per metre. The whole range has proved popular and has washed really well.

I have to say that I do love this style of romper and have already made several in different fabrics. It is a quick make, taking around an hour. I haven't done poppers around the legs, but it is easy to take on and off. I also put him in the sling quite a bit and it is the perfect sling outfit, comfy and nothing rides up. As well as this pattern I have made my eldest and myself a t-shirt to match.

I don't know about you, but it always feels wasteful when you have to print 10 pages to make one pattern. With that in mind I put this pattern together over just two A4 sheets for the romper and the leggings. You can print the two pages and then trace the bits you need. Much better than all the matching up and sticking together. I have used the tissue paper I wrap my fabric orders in to trace the patterns. I have done it in one size which I put at around 3-6 months however my little one has been wearing them from around 2 months and it still has plenty of room.
Although I will explain how to use a regular sewing machine for this pattern, I have used my overlocker. My Janome 6234XL was loaned to me from Janome and I have had a lot of fun getting to know it. It makes sewing up patterns like this so much quicker than a regular sewing machine. Threading an overlocker is always a daunting prospect and I have to admit I was dreading it running out of thread (it comes pre threaded with smaller reels). The machine is colour coded with dots so you really can't go wrong.

YOU WILL NEED
Pattern
KAM Snaps - 2 pairs
Overlocker (or regular sewing machine)
Interfacing - 4 small pieces to reinforce the snaps
Iron
METHOD
1. Print your pattern and trace the pieces. To print the pattern, you will need to save these images, open them onto a word document and enlarge them to fit the page exactly. There is a 1" mark so you can check the size is right when you print it. (if you have any problems saving the images, please feel free to message me and I will email them to you). You will need:
Romper front
Romper back
Lining front
lining back
Cuffs 14.5cm square x2


2. Cut out your fabric. I have used the white jersey with black clouds. I have made one pair with the cuffs in a contracting black and one the same.

3. On the lining, finish off the edges. I have used the overlocker, but you could use a zig zag or over edge stitch if you don't have one. Use enough interfacing to cover the last inch or so of the straps. I have used cotton interfacing from Bosal. This will reinforce the straps, so the fabric doesn't pull when the snaps are put in.

4. With right sides together match up the front and back with their corresponding lining. Sew them together from under the arm, all the way round to the other side using a 3/8th seam allowance. You can use an overlocker or a narrow zig zag stitch to do this. Turn them out, pushing the corners out.
TIP - If you are using an overlocker DO NOT sew over your pins. They can sometimes get hidden between seams so be extra careful when doing the fiddly bits like the cuffs.

5. Open out the lining and pin and sew the front to the back at the sides and around the legs. If you are using a regular sewing machine, you don't necessarily have to finish your edges. Jersey is great in that it doesn't fray but you can do for neatness if you prefer.

6. Fold the ankle cuffs in half from left to right, pin and sew. Fold from top to bottom with wrong sides together to make the cuffs.

7. This part is a bit fiddly. Line up the cuffs, with the edge of the ankles with right sides together. Match up the seam of the cuff with the inner leg. Sew them together. You will have to stretch the legs to fit.

8. Give it a good press and add the snaps to the straps.

9. To stop the lining curling up, sew it down along the seam using a straight stitch on your regular sewing machine.

Your romper is complete. I dare you to only make one pair! If you want to make the leggings, click here. For more tutorials, fabric arrivals and special offers, make sure you sign up to the mailing list.


Comments